
Setup and catalog
Settings — Portal experience
Choose checkout order, patient messaging, menu pages, notification types and custom patient fields.
Video note: The video shows an older layout, including a receipt checkbox that is no longer in Client Admin settings. Follow the current steps below.
Questions people ask
Can we add a sidebar link straight to a specific form?
Yes: Add link → Client form. The patient opens it already signed in.
Are selfies and IDs mandatory for patients?
New patients complete the ID check configured for your account. GEN Health ID check uses an ID photo and selfie. Plaid, when available, checks the patient’s name, date of birth and address instead. Require ID verification for new patients only lets existing patients skip that step.
Can the Book a Visit button in the patient portal go to our own site?
No; it can't be redirected or hidden. To book on your site, use the Client API (Settings → Developers).
Where to find it
Sidebar → Settings → Portal experience (/settings/patient-experience).
Access: Client Admin only. This page is not shown on Review Only accounts.
What you can do here
- Choose whether intake or payment comes first
- Set patient rules: ID checks, age limit, order review
- Control whether and how patients message you
- Edit the patient menu and dashboard
- Turn individual patient emails and texts on or off
- Collect your own patient fields
Choose whether intake or payment comes first
Use this to decide whether signed-in patients answer health questions before or after they pay.
Set the order
In Checkout, set Products and Labs to Intake first or Payment first.
Choose the disclaimer
Public checkout disclaimer shows the "changes cannot be made once an order is submitted" line as Hidden, Text, or a Checkbox the patient must tick.
Check the result: your choice is highlighted and your next test purchase follows it.
Access: Client Admin. Checkout links shared from Products carry their own order (for example Assessment-first).
Intake first collects forms before payment. Payment first collects payment before forms. This setting does not wait for a provider’s decision. To charge for the product after approval, use an Assessment-first checkout link; see Put checkout on your own website.
Set patient rules: ID checks, age limit, order review
Use this to change how checkout and visits behave for every patient.
Find the option
Scroll to Experience settings.
Turn it on or off
Click the option. It saves at once.
| Option | Turn it on when |
|---|---|
| Patient order roadmap | Booking first: visit-first orders start with the booked visit. |
| End custom-formulary orders early | Products mapped to your own (non-OnlyScripts) medication should end the roadmap early. |
| Show partner API data on staff patient profiles | Staff need the fields your website sends by API. |
| Start every form resubmission blank | A repeated form should start empty. |
| ID verification method | Choose GEN Health ID check (patients upload an ID photo and a selfie) or Plaid (patients skip the ID photo and selfie, and Plaid checks their name, date of birth and address against public records). Only admins can change it. If Plaid is unavailable, patients use the GEN Health ID check until it is back. If the setting fails to load it says ID verification settings didn't load; check your connection and click Try again. |
| Require ID verification for new patients only | Existing patients should skip the ID step. |
| Require patients to be 18 or older | Signup under 18 should be blocked. |
| Review prescription orders before checkout | Your team reviews before the patient is asked to pay: prescription payment prompts are held until your team reviews the order. |
| Partner collects product payment off-platform | Your own system charges API orders. |
| Review lab orders before sending | Your team releases lab orders from Orders. |
| Show visit purchases in the patient Orders tab | Patients should pay visits under Orders too. Visit purchases also appear as orders patients can open and pay; visits always stay on the Visits tab. Off by default. |
| Ask patients if they want a video call | Async buyers should be offered a live video call: for async purchases it shows the Do you need a live video call? choice. |
| Redirect patients when they leave a visit | Patients leaving a video visit should land on your URL, including when they click Back. Ticking it shows a Post-visit redirect URL field (for example https://example.com/thank-you); the URL must start with http:// or https://. |
| Patients can update their address | On by default. Patients edit their address from account settings; orders already placed keep their original address. Untick it to lock address changes. |
Check the result: the toast reads Patient experience updated.
Access: Client Admin. Staff coupon and marketing access moved to Settings — Staff permissions.
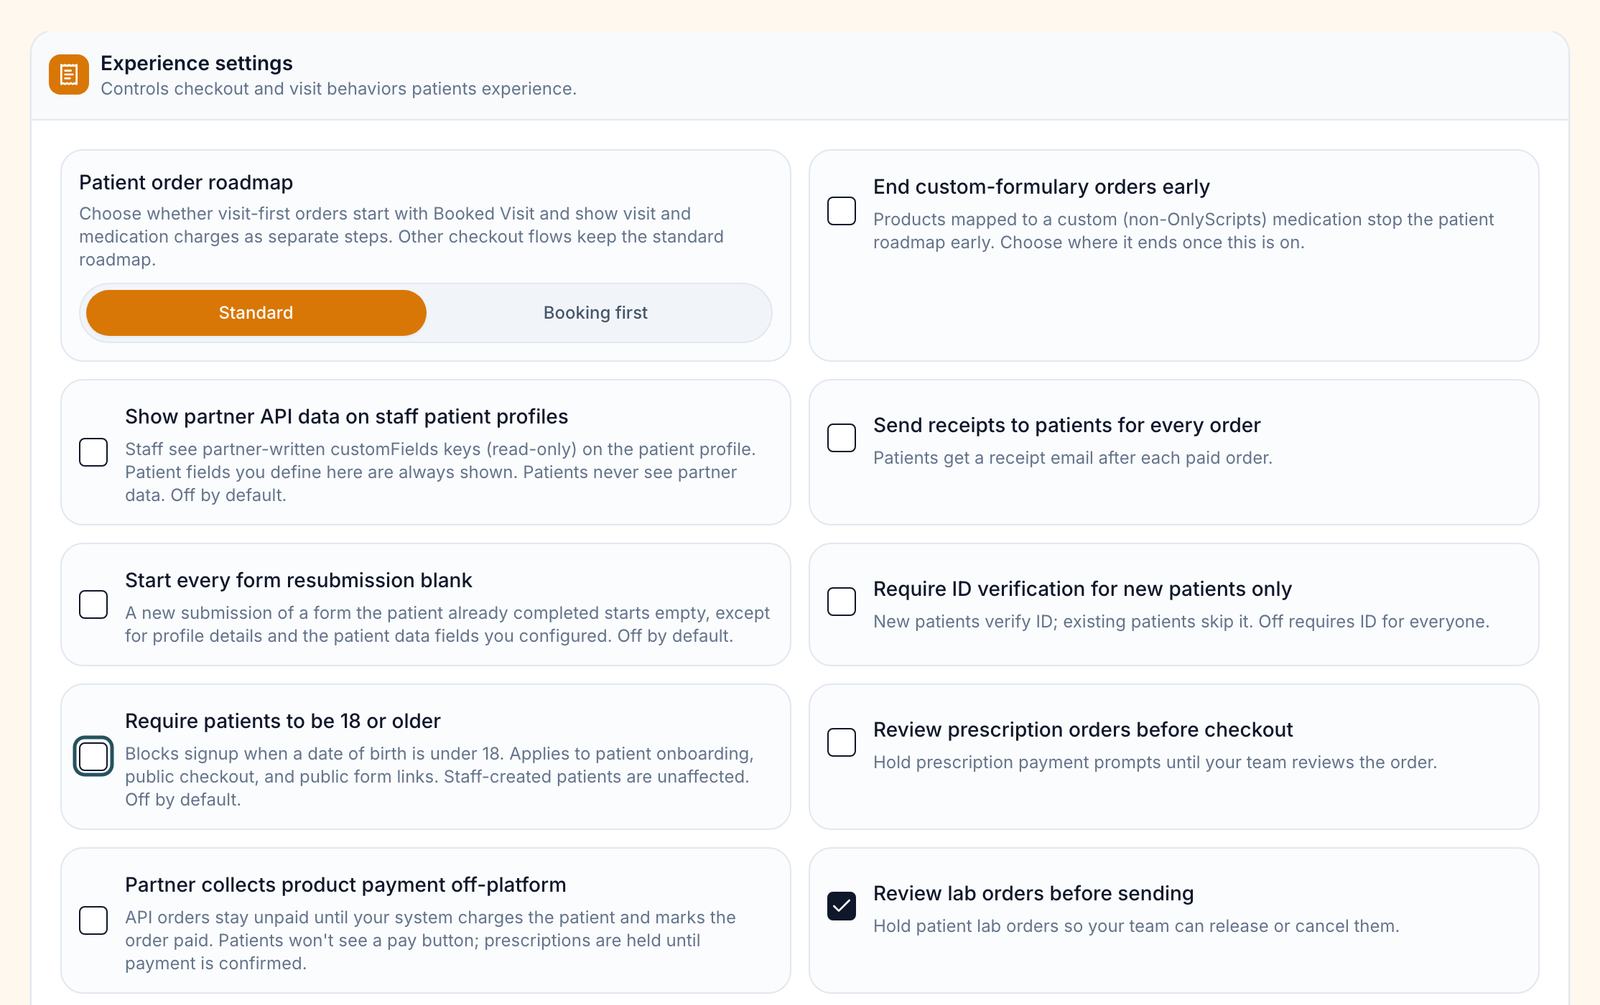
Control whether and how patients message you
Use this when patients can't find Messages, or to change what their texts show.
Choose who can message
In Patient messaging, turn on Allow patients to send messages and Client care team. Turn on Allow messaging without an order so patients can message before they buy.
Choose what patients see
Patient text notifications is Full text or Secure (texts only say a message is waiting). SMS display name is the sender name on lock screens.
Check the result: a test patient sees Messages in their menu.
Access: Client Admin. AI-assisted staff drafts also needs your provider network's approval.
Edit the patient menu and dashboard
Use this to show, hide, rename or reorder patient pages, or add your own links.
Show or hide pages
In Patient dashboard → Sidebar menu, tick or untick each page. Dashboard, Forms and Wallet can't be hidden. Use the arrows to reorder.
Rename a page
Click the pencil (for example Edit Visits), change Menu label, Icon or Page description, then Save.
Add a link
Click Add link, enter a Label, choose Website URL or Client form, then Save link. Add section groups links.
Choose dashboard blocks
- Click Dashboard sections → Customize dashboard to open the full-screen editor.
- Use Ask AI to build a section.
- Click Publish and confirm. Patients see the changes on their next visit.
If the card says Turned off for this account, patients see the built-in sections. Ask Support to enable custom sections.
Check the result: the PREVIEW shows the change; hidden pages read HIDDEN.
Access: Client Admin.
Turn individual patient emails and texts on or off
Use this to stop one kind of patient email, such as order status updates.
Find the row
Scroll to Notifications. Email only rows have no text version. The prescription rows are:
- Prescription sent to pharmacy: when a prescription is first sent to the pharmacy.
- Prescription tracking updates: when shipment tracking is added or changes.
Untick it
Untick Email or SMS on that row.
Check the result: that kind of message stops appearing in Settings — Logs.
Access: Client Admin. To stop every patient email and text, use Settings — Notifications.
Turn off Account creation email before a bulk import if patients shouldn't be invited yet. Never turn off Visit access delivery: patients lose the link to book or join their visit.
Collect your own patient fields
Use this to store something about every patient, such as a referral source.
Start a field
In Patient custom fields, click New field.
Describe it
Enter a Label and choose a Type and Group.
Choose where it appears
Tick places such as Patient profile or Patients table, then click Create field.
Check the result: the field is listed as Active and you can add it to a form in Forms.
Access: Client Admin.
What's on this page
| Control | What it does |
|---|---|
| No Save button | Switches and choices save when you click them. Dialogs have their own save. |
| Customize dashboard | Opens the dashboard editor. Ask AI drafts sections, Publish makes edits live, and Not saved with Retry appears when an edit didn't save. |
| Portal layout | Navigation style, border style and width of the patient portal. |
What can go wrong
| What you see | Why | Fix |
|---|---|---|
| Messages is ticked but patients don't see it | Patients without an order can't message | Turn on Allow messaging without an order. |
| Patients get a pop-up asking them to choose a consultation after buying | Ask patients if they want a video call is on | Turn it off. |
| Patients got awaiting payment emails for orders you already collected | Order status updates is on | Untick it. This stops every order status email. |
| Some changes did not save. Retry first. or Publishing failed. Try again. | A dashboard edit didn't save, or the publish didn't go through | Click Retry in the editor, then Publish again. Closing the editor first loses unsaved edits. |
| Could not load the dashboard or Preview didn't load | The dashboard didn't load | Click Retry. The editor still opens. |
| Patient texts don't show your brand name | SMS display name is empty | Enter a name that doesn't state a treatment. |
Related
Was this helpful?